
How doesn’t love a little bit of newness in their kitchen? Adding some color to the old cabinets will change the entire outlook. For this, you must learn how to paint a kitchen cabinet.
We have made a list of easy steps that can help you prep, prime, and paint the kitchen cabinets without any hassle!
So Let’s started & Keep Reading on…

Step by Step Process How to Paint a Kitchen Cabinet
Whenever you are worried about how to paint a kitchen cabinet, have faith in us! If you want to learn about how to paint kitchen cabinets without sanding, you can simply avoid the steps of priming and sanding and paint it directly. However, we recommend priming for a durable result!
Step 1: Prepare the Kitchen

If you are tired of the boring brown color, you can get the best white paint for the kitchen cabinet today! For this, all you need to do is prep, prime, and paint! Your first job is to get the kitchen ready for the process of painting. First of all, you have to empty the cabinets and clear the counters. Remove any appliances that are set there.
Transfer the tables and additional furniture to other places. Now that you are done with moving everything out, you have to get your hands on rosin paper. All you have to do is tape it on the countertops and the flooring of the kitchen. It will protect them from all sorts of fumes and dust. Also, don’t forget to add plastic sheets on the windows, interior doorways, and backsplash.
Now, you have to mask the wall around the cabinet as you are going to paint the cabinet only. It is better to get a worktable to keep your gear and accessories in order. This will help in painting the drawers, doors, and shelves.
Step 2: Remove the Drawers, Shelves, and Door
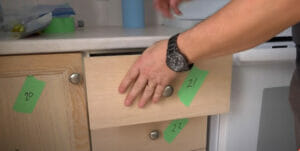
Once you have taped and masked everything, go through the drawers and shelves. With the help of a screwdriver and other accessories, you have to take out the hinge screws first from the cabinet frame. After this, slowly remove the doors of the cabinets. In this situation, people often forget to number the pieces.
Do it because otherwise, you are going to mess it up. There might be some self-hanging hardware, remove them. After removing the pills and hinges, keep them on the worktable so that you can reuse them if required. Make sure you cover it with new tape to keep it in place.
Step 3: Cleaning the Area
Now that you have freed the doors and drawers, you can clean the surface easily. Don’t worry about buying new cleaners for this purpose; the ordinary cleaners will be enough. First of all, with the cleaners, you have to remove the grime from the frames, drawers, and doors.
If you see that there is a lot of grime, settle for TSP, and don’t forget to take the safety precautions before you use it. Start cleaning the cabinets and make sure they are cleaned properly. Now, rinse them with water and dry them carefully. In this situation, you can start preparing the boxes and they move for priming the cabinet box.
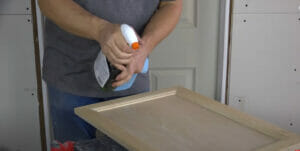
Step 4: Priming the Boxes

After prepping the cabinet boxes, you have to prime them before you paint. Any regular primers will work, but if you see too much stain, rely on stain-blocking primers. Otherwise, go for the acrylic latex or oil-based primer depending on the paint you are going to use on top of it.
Start from the top part of the cabinet. With a brush, start priming the area. Also, certify that you are following the underlying structure of the door and the cabinet when you use the brush.
Step 5: Sanding, Caulking, and Filling
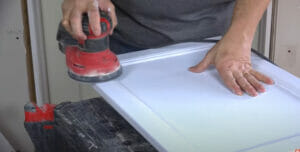
When you are done with the primer, you have to wait for some time. In this period, the primer will be dried down and you can be ready to sand the area. Here, you have to start sanding with 220-grit paper. Sand the flat areas carefully. There will be profiled space too and, in that case, rely on the medium-grit sanding sponge.
Eventually, you will get a glass smooth finish. Get your hands on the open seams and there, pour a thin bead of latex caulk. Move the hand and pull the tip. After this, use a dampened finger to smoothen the caulk. Keep in mind that you have to fill the scratches and dents with a putty knife. Wait for the spackle to dry, it will take more or less one hour.
Start sanding with the first paper once again and vacuum it. Now, pick up a fast-drying oil-based primer spray and spot-prime the areas where there are imperfections. Wait for one hour again and use 280-grit sandpaper now to send it. Sand it lightly and then you can vacuum the whole area to clean it and, with a tack cloth, wipe it carefully.
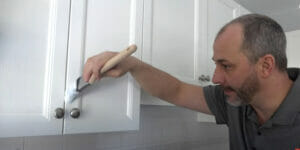
Step 6: Painting the Cabinet Boxes

In this situation, you are ready to paint the cabinets. Go for the same color that was used before. Go for two coats or a bit more and you will be done. In some cases, if the priming is perfect, you can do the job in one coat too!
However, at times, we love to use a new color. If the previous color was dark, it can be tough to paint a lighter one now. It will take more than three coats to cover up properly. Try to use a new brush for every coating if you want to get it perfect. Start from the top part and add paint to the cabinet’s outer part across the grain.
Immediately after it, tip it off with the grain carefully. When you are done with the exterior, move to the interior part and it is better that you use a mini paint roller to get the work done. Apply paint to it. In between the coats, try to sand it a bit so that you can keep the areas smooth and dirt-free.
Step 7: Prime and Paint the Drawers, Doors, and Shelves
Once you are done with the boxes, you have to move to the doors, shelves, and drawers. Go for the same method we have mentioned above for priming them and painting them. Here, you can use the worktable for painting them.
After you are done with the priming and painting, add the doors with the screws and put back all the pieces. Before you do it, you have to wait for some hours to let the paint dry. Once the coating is dried, replace the shelves checking out the numbers!
Wrap Up
Painting the kitchen cabinet is not tough. All you need to do is prep it right and then prime and paint! However, be careful about which primer and which paint you choose!
You May Read Also